I've always admired artists and craftspeople who share their techniques and secrets. I've spent many nights surfing the interwebs for tips and tricks that help me to be a better artist, and I am at times overwhelmed by people's generosity with their time and talents. Hence, my homage to all of the craftspeople out there in the world who share what they know.
Here's a brief photo tutorial of one of my favorite necklaces: To the Moon and Back. I'll quickly go through the steps so you get an idea of what's involved in a piece like this. Not a lot of details, so feel free to message me if you are wondering about something. This is mostly a hand-cut piece, so I start with a pattern and trace it onto 24 gauge sterling silver sheet with a fine-tipped sharpie.

Next, I cut it out with a jeweler's saw. I LOVE beeswax and first started using it with some of my lampworking presses. I use it to lube my saw blade, making cutting out the silver much easier. I break far less saw blades when my blade is lubed. You can use other products to do this, but the beeswax is always so handy on my work bench and I love the smell of it.

Here's a shot of me using my saw to cut out the shapes. I don't use a typical metalsmith's workbench, I just couldn't stomach the expense. I use a nice oak-topped table from Ikea and it gives me a great solid work surface with plenty of storage. Unfortunately, that means that I have to saw over the garbage can because I don't have a catch tray for my silver bits. It also means that I often have to dig through the garbage to find pieces that I accidentally drop, but, it keeps my carpet free of metal shavings.

When I'm cutting out the middle of a shape, I pierce it with my flex-shaft. A flex-shaft is like a fancy drill/polisher with a foot pedal (like a sewing machine) and I love it. Once I drill the hole I can fit my blade through it and saw out the inside of the piece.

Here are the custom pieces all cut out . . . now it's time to file them down. I start with larger files to get rid of the bulk and then use smaller files to smooth and refine the shape of each piece.

Next comes the sanding. There are lots of ways to sand silver. I love these sanding pads from Hobby Lobby. I can find them in the wood crafts aisle and they are small enough to fit in my hand, yet firm enough to work around my pieces, yet they bend so I can get the curves just so. I usually use 2 different grits, one that's rough and one that's really fine to smooth out all of the edges and surfaces. Below is a photo of the pieces all cut, filed, sanded, and ready for the next step.

These pieces are going to have an over-all hammered texture along with stamped lettering. I prefer to heat the pieces - a process called annealing - to soften them and make them easier to work with. I don't always do this, usually only if the piece requires a lot of hammering. This process oxidizes the silver and it turns a dark color. Don't worry, we'll take care of that with a pickle solution later.

Next comes the stamping. I use scotch tape to anchor my piece to my steel block, and a sharpie to mark out where the lettering goes. I use the big hammer when stamping, and the smaller hammer to give the piece a hammered texture.

Here's a look at a few of my favorite stamping letters. Stamping is a whole other topic. I've been stamping for about 10 years and like everything else, I've come up with my own system that works for me. If you're interested in learning how to stamp, I recommend watching some free tutorials on a site like Beaducation, or youtube.

Next, I gently hammer all of the edges and then work my way around the whole piece with the rounded end of the ball peen hammer. This can sometimes put an unwanted curve in the piece, so I will often hammer it flat or hammer it gently from the back side to give it a better dimension. The photo below shows a piece where the left side has been hammered from the reverse to give it a gentle curve.

You can see the curve better in this photo, where the entire piece has been hammered from both sides. You'll notice that I've punched a hole for the attachment.

More stamping of the other pieces. You can see my markings for the lettering:

Next, I solder the pieces onto the chain. This step isn't necessary and a lot of people don't do this. I just hate to have loose ends or pieces that can potentially catch on a sweater and open the jump ring making it easier for the piece to fall off, so I solder as many jump rings as I can. It is sometimes impossible depending on the style of charm or chain, and honestly, my torch is not very delicate (I use a plumber's torch or a creme brule torch) so I can run the risk of melting delicate chain. This one is substantial enough that I feel it's necessary, even though it's an extra step.

Into the pickle pot the whole thing goes.

When it comes out of the pickle pot everything looks sort of white. I use a brass bristle brush and a piece of 3M kitchen scrub pad to shine it up. Water helps the process, so I usually do it in the bathroom sink.


Here's the piece all shined up and waiting for patina.

I coat the fronts of each charm with a silver black solution or liver of sulpher, and let it air dry.

Next, I polish with size 0000 steel wool. I do this down inside a deep cardboard box to minimize metal shavings getting everywhere. It's possible that I've used the same cardboard box for about 10 years. It's a perfect box, so why change?

Next, the whole necklace goes into my Lortone tumbler with a little "shine bright" and stainless steel shot.

I like to let it tumble for a few hours. This hardens and polishes the silver. This is a step that I can skip, depending on the desired look of the piece. The chain got hot while I was soldering the rings and it oxidized, which gave it a dull look. Tumbling it is the easiest way to restore the shine. But, sometimes I want the piece to have a more organic look and not be so shiny, so I will polish it by hand.

We are almost done! When I took the necklace out of the tumbler it was a giant tangled knot! I knew that would happen because the chain was so long, but it was worth it to have the shine. After untangling the chain, I attached the clasp and wired together a freshwater pearl and some Swarovski crystals to give it a little sparkle and bling. I use head pins and silver daisy spacers.

Next, comes the photography. This is always a challenge and I've tried lots of different methods. Here's what I've used the longest: an ice cream bucket and clamp lights. The ice cream bucket diffuses the light and gives everything a soft glow instead of a bright reflection. I lay out my piece on a square of travertine and put the bucket over the top. (I keep the whole photography set-up in a plastic storage bin that I tuck under a table when not in use.) There is a hole in the top of the bucket for my camera and because of the reflective nature of the silver, I often get a black dot reflected back in the photo. This time, I used my phone to take all of the photos (hubby has commandeered the nice camera again), and since the back of my phone is white . . . no black dot. That black dot has plagued me for years! I might have just fixed that pesky problem.

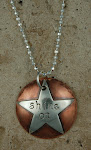
Voila! The final product: